How to Change a Word Document to Landscape: A Comprehensive Guide
Microsoft Word is a versatile tool used by professionals, students, and anyone who needs to create documents. One common formatting task is changing the page orientation. Knowing how to change a Word document to landscape can significantly improve the presentation and readability of certain types of content, such as wide tables, charts, or images. This guide provides a step-by-step walkthrough of how to change your document’s orientation and offers tips for managing different orientations within a single document.
Understanding Page Orientation in Word
Before diving into the process, it’s important to understand the difference between portrait and landscape orientations. Portrait orientation is the default setting, where the page is taller than it is wide, like a typical letter or book page. Landscape orientation, on the other hand, is wider than it is tall, resembling a landscape painting. This orientation is often preferred for content that requires more horizontal space.
Changing the Entire Document to Landscape
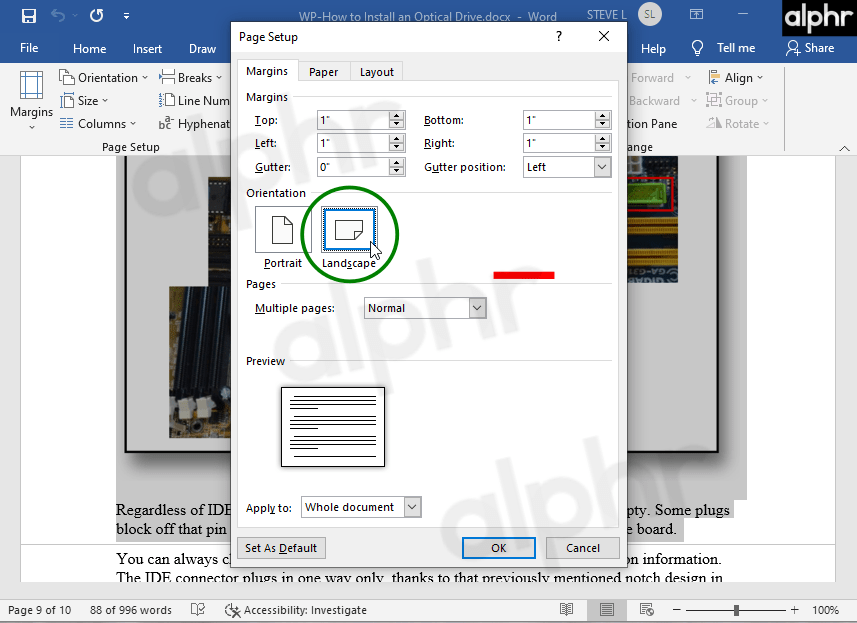
The simplest scenario is when you want to apply landscape orientation to the entire document. Here’s how you do it:
- Open your Microsoft Word document. Locate the document you wish to modify and open it in Microsoft Word.
- Navigate to the Layout Tab. In the Word ribbon at the top of the screen, click on the “Layout” tab. In some older versions of Word, this may be labeled “Page Layout.”
- Access the Orientation Option. Within the “Layout” tab, find the “Page Setup” group. Click on the “Orientation” dropdown menu.
- Select Landscape. From the dropdown menu, choose “Landscape.” The entire document will now switch to landscape orientation.
This method is straightforward and quickly applies the change to all pages. However, what if you only need a portion of your document in landscape while the rest remains in portrait?
Changing Specific Pages to Landscape: Using Section Breaks
For documents that require a mix of portrait and landscape pages, you’ll need to use section breaks. Section breaks divide your document into distinct sections, allowing you to apply different formatting options to each. Here’s how to insert and utilize them:
Inserting Section Breaks
- Identify the Insertion Point. Place your cursor at the end of the page before the page you want to change to landscape. This is where you’ll insert the section break.
- Navigate to the Layout Tab. As before, click on the “Layout” tab in the Word ribbon.
- Access the Breaks Option. In the “Page Setup” group, click on the “Breaks” dropdown menu.
- Choose a Section Break Type. Under the “Section Breaks” section, select “Next Page.” This inserts a section break that starts the new section on the next page. You can also use “Continuous” if you want the new section to start on the same page.
- Insert Another Section Break (if needed). After the landscape page(s), insert another “Next Page” section break at the end of the last landscape page to revert back to portrait for subsequent pages.
Applying Landscape Orientation to the Section
- Click within the Section. Click anywhere on the page(s) that you want to be in landscape orientation (the section you’ve created).
- Navigate to the Layout Tab. Go to the “Layout” tab in the Word ribbon.
- Access the Orientation Option. In the “Page Setup” group, click on the “Orientation” dropdown menu.
- Select Landscape. Choose “Landscape” from the dropdown menu. Only the selected section will change to landscape orientation, leaving the other sections in portrait.
By using section breaks, you can precisely control which parts of your document are in landscape and which are in portrait. This is particularly useful for reports, presentations, or any document that includes both text and visual elements.
Troubleshooting Common Issues
While changing the page orientation in Word is generally straightforward, you might encounter some issues. Here are a few common problems and their solutions:
- Incorrect Section Break Placement: If the orientation changes are affecting more than just the intended pages, double-check the placement of your section breaks. Ensure they are precisely where you want the orientation to switch.
- Accidental Changes to the Entire Document: If you accidentally change the entire document to landscape, undo the change (Ctrl+Z or Cmd+Z) and then carefully follow the steps for using section breaks.
- Formatting Inconsistencies: Sometimes, changing the orientation can affect other formatting aspects, such as margins or headers/footers. Review your document carefully after making the changes and adjust as needed.
- Print Preview Discrepancies: Always use the print preview feature to ensure the document will print as expected. This can help you catch any unexpected formatting issues before printing.
Advanced Tips for Working with Page Orientation
Beyond the basic steps, here are some advanced tips to help you optimize your use of page orientation in Word:
- Using Different Headers and Footers: Section breaks also allow you to create different headers and footers for each section. This can be useful for adding section-specific information or page numbering.
- Adjusting Margins: Consider adjusting the margins for landscape pages to maximize the usable space. Narrower margins can allow you to fit more content on a single page.
- Creating Custom Templates: If you frequently work with documents that require mixed orientations, create a custom template with the necessary section breaks and formatting already in place. This can save you time and effort in the long run.
The Importance of Choosing the Right Orientation
Selecting the appropriate page orientation is crucial for effective document design. Landscape orientation is particularly beneficial when you need to display large tables, charts, diagrams, or images that require more horizontal space. It can also enhance the visual appeal of your document and make it easier for readers to understand complex information. Understanding how to change a Word document to landscape is a valuable skill for anyone working with Microsoft Word.
Alternative Methods for Changing to Landscape
While the ribbon method is the most common, there are alternative ways to access the page setup options. You can also access the Page Setup dialog box by double-clicking on the ruler at the top or side of the page (if the ruler is visible). From there, you can adjust the orientation, margins, and other page settings.
Conclusion: Mastering Page Orientation in Word
Knowing how to change a Word document to landscape is a fundamental skill for anyone who wants to create professional-looking documents. Whether you need to apply landscape orientation to the entire document or just specific pages, the steps outlined in this guide will help you achieve the desired results. By using section breaks and other advanced techniques, you can create documents that are both visually appealing and highly effective in conveying your message. Remember to always review your document carefully after making changes to ensure that everything is formatted correctly. Practice these techniques, and you’ll be well on your way to mastering page orientation in Microsoft Word. The ability to effectively use landscape and portrait orientations can significantly enhance the presentation of your work, making it more engaging and easier to understand. Make sure you understand how to change a Word document to landscape. Effectively using how to change a Word document to landscape can improve readability. The process of how to change a Word document to landscape is quite simple. Remember the steps for how to change a Word document to landscape. This guide explains how to change a Word document to landscape. Understanding how to change a Word document to landscape will help you. The article explained how to change a Word document to landscape. Don’t forget how to change a Word document to landscape.
[See also: How to Insert a Table of Contents in Word]
[See also: How to Convert Word to PDF]
[See also: How to Add a Watermark in Word]
