Mastering the Sight Picture: A Comprehensive Guide for Shooters
The sight picture is a fundamental concept in marksmanship, representing the relationship between the shooter’s eye, the sights of the firearm, and the target. Achieving a consistent and accurate sight picture is crucial for consistent shot placement, regardless of the firearm being used. This article provides a comprehensive guide to understanding and mastering the sight picture, covering its components, techniques, common errors, and drills to improve accuracy.
Understanding the Components of a Sight Picture
A proper sight picture comprises three key elements that must be aligned correctly for accurate shooting:
- The Rear Sight: The rear sight is the aiming reference point located closest to the shooter’s eye. It can be a notch, aperture (as in aperture sights or ‘peep’ sights), or other visual marker.
- The Front Sight: The front sight is the aiming reference point located near the muzzle of the firearm. It is typically a blade, post, or fiber optic.
- The Target: The target is the intended point of impact for the projectile.
The goal is to align these three elements in a specific manner that ensures the bullet will travel to the desired location on the target. The precise alignment depends on the type of sights used.
Types of Sight Pictures
Different types of firearms and sights require slightly different sight picture configurations. Here are some common examples:
Iron Sights
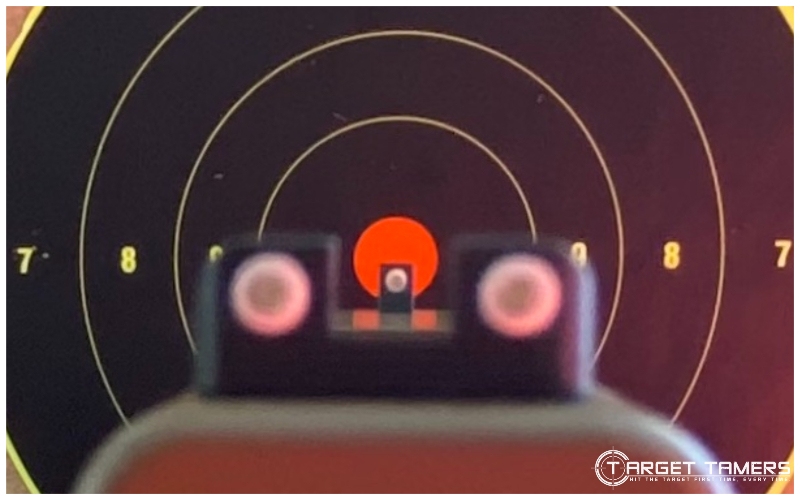
Iron sights are the most traditional type of sights and are commonly found on rifles, pistols, and shotguns. The most common sight picture for iron sights involves aligning the top of the front sight post with the top of the rear sight, ensuring equal light on either side of the front sight post within the rear sight notch. The focus should be on the front sight, with the target and rear sight appearing slightly blurred. This is often referred to as ‘front sight focus’.
Aperture Sights (Peep Sights)
Aperture sights, also known as peep sights, use a small hole (aperture) in the rear sight. The shooter looks through the aperture and aligns the front sight within the circle. The principle of front sight focus still applies here. Aperture sights are known for their speed and ease of use, making them popular on rifles.
Red Dot Sights
Red dot sights project a red dot onto a lens, which serves as the aiming point. With a red dot sight, the sight picture is simplified: the shooter simply places the red dot on the target. Unlike iron sights, the shooter’s focus should be on the target, with the red dot superimposed on the desired point of impact. Parallax can be a factor with some red dot sights, so it’s important to understand the specific sight’s characteristics. [See also: Understanding Red Dot Sight Parallax]
Optical Scopes
Optical scopes use magnified optics to provide a clearer and more precise sight picture, especially at longer distances. Scopes typically have crosshairs or other reticle patterns that serve as the aiming point. Proper eye relief (the distance between the shooter’s eye and the scope’s eyepiece) is crucial for a clear and full sight picture. Like red dot sights, the focus should be on the target with the reticle superimposed.
Achieving a Consistent Sight Picture
Consistency is key to accurate shooting, and a consistent sight picture is essential for achieving this. Here are some tips for developing a consistent sight picture:
- Proper Grip: A firm and consistent grip is the foundation for a stable shooting platform. Ensure your grip is comfortable and allows for proper trigger control.
- Stable Stance: A stable stance helps to minimize movement and maintain a consistent sight picture. Experiment with different stances to find what works best for you.
- Breath Control: Breath control is crucial for minimizing movement during the shot. Take a deep breath, exhale partially, and hold your breath briefly while aligning the sights and pressing the trigger.
- Trigger Control: A smooth and consistent trigger pull is essential for avoiding disturbing the sight picture during the shot. Practice dry firing to develop proper trigger control.
- Front Sight Focus: As mentioned earlier, maintaining focus on the front sight is crucial for achieving a clear and accurate sight picture with iron sights and aperture sights.
Common Errors in Sight Picture and How to Correct Them
Several common errors can lead to an inaccurate sight picture and poor shot placement. Here are some of the most common errors and how to correct them:
- Canting the Firearm: Canting the firearm (tilting it to one side) will cause the bullet to impact off to the side. Ensure the firearm is held vertically to maintain a correct sight picture. A bubble level attached to the firearm can help with this.
- Incorrect Eye Relief: Incorrect eye relief with optical scopes can result in a blurry or incomplete sight picture. Adjust the scope’s position until you have a clear and full view through the scope.
- Parallax Error: Parallax error occurs when the target image and the reticle are not on the same focal plane, causing the point of impact to shift as the shooter’s eye moves. Some scopes have parallax adjustment knobs to correct for this error.
- Inconsistent Cheek Weld: With rifles, an inconsistent cheek weld (the position of your cheek on the stock) can lead to variations in the sight picture. Ensure a consistent cheek weld for each shot. Adjustable stocks can help with this.
- Flinching: Anticipating the recoil of the firearm can cause the shooter to flinch, which can disrupt the sight picture and pull the shot off target. Practice dry firing and using dummy rounds to overcome flinching.
Drills to Improve Your Sight Picture
Regular practice is essential for improving your sight picture and overall shooting accuracy. Here are some drills you can use to hone your skills:
- Dry Firing: Dry firing (practicing without live ammunition) is an excellent way to develop proper trigger control and maintain a consistent sight picture. Focus on aligning the sights and pressing the trigger smoothly without disturbing the sight picture.
- Dot Drill: Place a small dot on a target and practice aiming at the dot with your firearm. Focus on maintaining a consistent sight picture and pressing the trigger smoothly.
- Ball and Dummy Drill: Have a training partner randomly load live and dummy rounds into your magazine. This will help you identify and correct any flinching or anticipation of recoil.
- Timed Drills: Set a timer and practice drawing your firearm and acquiring a sight picture as quickly and accurately as possible.
- Distance Variation: Practice shooting at targets at varying distances to adapt to different sight picture requirements.
The Importance of Follow-Through
Follow-through is the continuation of the shooting process after the shot has been fired. Maintaining the sight picture and trigger press for a brief moment after the shot helps to ensure that you haven’t disturbed the firearm during the critical moment of bullet exit. This is an often overlooked, but crucial aspect of accurate shooting. [See also: Advanced Marksmanship Techniques]
Conclusion
Mastering the sight picture is a fundamental skill for any shooter, regardless of their experience level. By understanding the components of a sight picture, practicing proper techniques, and correcting common errors, you can significantly improve your shooting accuracy and consistency. Remember to focus on the front sight, maintain a stable shooting platform, and practice regularly to develop a consistent and accurate sight picture. Consistent practice and attention to detail will translate to improved performance on the range and in the field. Understanding your equipment and the fundamentals of marksmanship will ensure you are a safe and accurate shooter.
