Staining Wood Fence: A Comprehensive Guide to Protecting and Beautifying Your Investment
A wood fence is a significant investment, providing privacy, security, and aesthetic appeal to your property. However, untreated wood is vulnerable to the elements, leading to rot, decay, and a diminished lifespan. Staining wood fence is a crucial step in protecting your investment and enhancing its natural beauty. This comprehensive guide will walk you through everything you need to know about staining wood fence, from preparation to application, ensuring a long-lasting and visually appealing result.
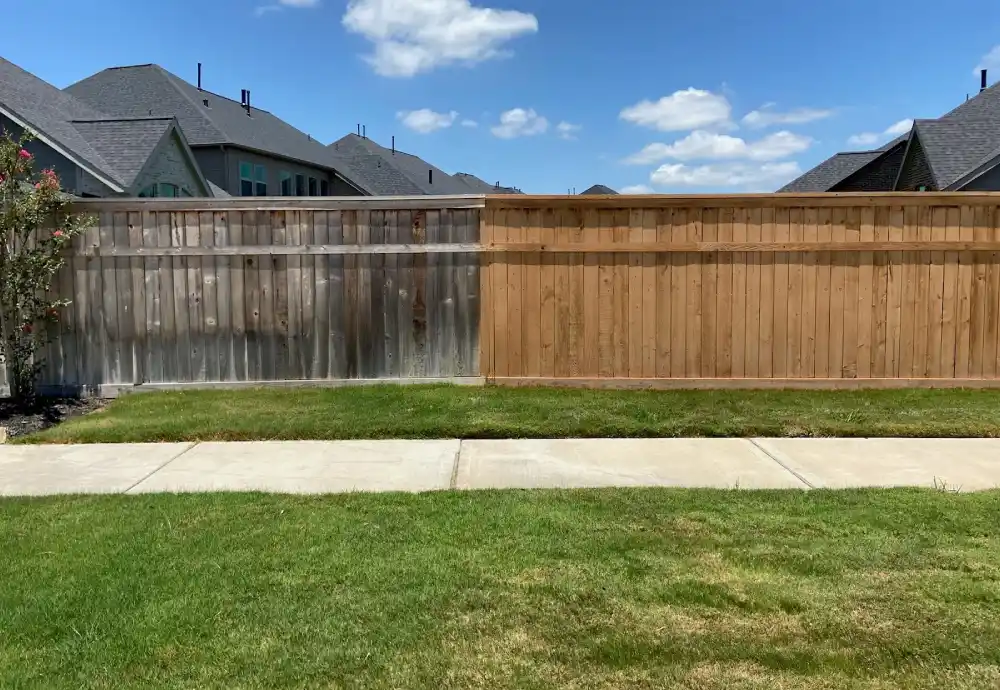
Why Stain Your Wood Fence?
Staining wood fence offers several key benefits:
- Protection from the Elements: Stain acts as a barrier against moisture, UV rays, and temperature fluctuations, preventing warping, cracking, and fading.
- Prevention of Rot and Decay: Many stains contain preservatives that inhibit the growth of mold, mildew, and wood-decaying fungi.
- Enhanced Aesthetic Appeal: Stain allows you to customize the color and tone of your fence, complementing your home and landscape.
- Increased Lifespan: By protecting the wood from damage, staining wood fence significantly extends its lifespan, saving you money on repairs and replacements.
Choosing the Right Stain for Your Wood Fence
Selecting the appropriate stain is crucial for achieving the desired look and level of protection. Here’s a breakdown of the different types of stains available:
Types of Wood Stains
- Oil-Based Stains: These stains penetrate deeply into the wood, providing excellent protection against moisture and UV damage. They typically offer a richer color and longer lifespan than water-based stains. However, they can be more difficult to clean up and may contain higher levels of VOCs (volatile organic compounds).
- Water-Based Stains: Water-based stains are easier to clean up, have lower VOC content, and dry faster than oil-based stains. While they may not offer the same level of protection as oil-based stains, advancements in water-based technology have improved their performance significantly.
- Clear Sealers/Toners: These provide minimal color change while protecting the wood from water damage. They are ideal if you want to preserve the natural look of the wood.
- Semi-Transparent Stains: These stains allow some of the wood grain to show through while adding a hint of color. They offer a good balance between protection and aesthetic appeal.
- Semi-Solid Stains: These stains offer more color coverage than semi-transparent stains, obscuring more of the wood grain. They provide better protection against UV damage and are a good choice for fences with minor imperfections.
- Solid Stains: These stains offer the most color coverage, completely obscuring the wood grain. They provide the highest level of protection against UV damage and are a good choice for older fences or fences with significant imperfections. Solid stains essentially act like paint.
Factors to Consider When Choosing a Stain
- Type of Wood: Different types of wood absorb stain differently. Consider the type of wood your fence is made of (e.g., pine, cedar, redwood) and choose a stain that is compatible.
- Desired Color: Select a color that complements your home and landscape. Test the stain on a small, inconspicuous area of the fence to ensure you like the color.
- Level of Protection: Consider the climate in your area and choose a stain that offers adequate protection against the elements.
- VOC Content: If you are concerned about VOCs, choose a low-VOC or zero-VOC stain.
Preparing Your Wood Fence for Staining
Proper preparation is essential for achieving a professional-looking finish and ensuring the stain adheres properly. Follow these steps:
Cleaning the Fence
Remove any dirt, debris, mold, or mildew from the fence using a pressure washer or a scrub brush and a cleaning solution. A mixture of water and mild detergent is usually sufficient. For stubborn stains, you may need to use a specialized wood cleaner. Allow the fence to dry completely before proceeding.
Repairing Damaged Wood
Replace any damaged or rotted wood boards. Tighten any loose nails or screws. Fill any holes or cracks with wood filler. Sand the repaired areas smooth to blend them with the surrounding wood.
Sanding the Fence
Sanding the fence will help to create a smooth surface for the stain to adhere to. Use a medium-grit sandpaper (e.g., 80-grit) to sand the entire fence. Pay particular attention to any rough spots or splinters. After sanding, remove any dust with a tack cloth or a vacuum cleaner.
Protecting Surrounding Areas
Cover any plants, shrubs, or other landscaping around the fence with drop cloths or plastic sheeting to protect them from overspray or drips. Use painter’s tape to mask off any areas you don’t want to stain, such as posts or trim.
Staining Your Wood Fence: Step-by-Step Guide
Now that your fence is properly prepared, you’re ready to apply the stain. Follow these steps:
- Choose a Suitable Day: Avoid staining on a windy or rainy day. The ideal temperature is between 50°F and 90°F.
- Stir the Stain Thoroughly: Stir the stain well to ensure the pigments are evenly distributed.
- Apply the Stain: Use a brush, roller, or sprayer to apply the stain to the fence. Work in small sections, following the grain of the wood. Apply the stain evenly, avoiding drips or runs.
- Back-Brush or Back-Roll: If using a sprayer, back-brush or back-roll the stain immediately after application to ensure it penetrates the wood properly.
- Wipe Off Excess Stain: After a few minutes, wipe off any excess stain with a clean cloth. This will help to prevent a sticky or uneven finish.
- Apply a Second Coat (Optional): If you desire a darker color or more protection, apply a second coat of stain after the first coat has dried completely.
- Allow the Stain to Dry: Allow the stain to dry completely before using the fence. Drying time will vary depending on the type of stain and the weather conditions.
Tips for a Professional-Looking Finish
- Use High-Quality Tools: Invest in good-quality brushes, rollers, or sprayers for a smoother and more even application.
- Apply Thin Coats: Applying thin coats of stain is better than applying thick coats. Thin coats will dry faster and prevent drips or runs.
- Work in Sections: Work in small sections to ensure you apply the stain evenly and have time to wipe off any excess.
- Overlap Your Strokes: Overlap your strokes slightly to prevent streaks or gaps.
- Pay Attention to Detail: Pay attention to detail, especially around posts, trim, and other areas that are difficult to reach.
- Clean Your Tools Immediately: Clean your brushes, rollers, or sprayers immediately after use to prevent the stain from drying and ruining them.
Maintaining Your Stained Wood Fence
To keep your staining wood fence looking its best, it’s important to perform regular maintenance. Clean the fence annually with a mild detergent and water to remove any dirt or debris. Inspect the fence for any signs of damage, such as cracks or rot. Touch up any areas that are fading or peeling. Reapply stain every few years, depending on the type of stain and the weather conditions in your area. Properly maintaining your staining wood fence will extend its lifespan and keep it looking beautiful for years to come.
Common Mistakes to Avoid When Staining a Wood Fence
- Skipping Preparation: Failing to properly clean, repair, and sand the fence will result in a poor finish and reduced stain adhesion.
- Choosing the Wrong Stain: Selecting the wrong type of stain for your wood or climate can lead to premature failure.
- Applying Stain in Bad Weather: Staining in direct sunlight, rain, or extreme temperatures can affect the stain’s drying time and adhesion.
- Applying Too Much Stain: Applying too much stain can result in drips, runs, and a sticky finish.
- Not Stirring the Stain: Failing to stir the stain properly can result in uneven color distribution.
The Benefits of Hiring a Professional
While staining wood fence is a DIY project, hiring a professional offers several advantages. Professionals have the experience, tools, and knowledge to ensure a high-quality finish. They can also save you time and effort. If you’re not comfortable staining wood fence yourself, or if you want to ensure the best possible results, consider hiring a professional.
Cost Considerations for Staining Wood Fence
The cost of staining wood fence varies depending on the size of the fence, the type of stain used, and whether you hire a professional. DIY staining is generally more affordable, but it requires time and effort. Hiring a professional can be more expensive, but it guarantees a professional-looking finish. Get quotes from several contractors before making a decision.
Staining wood fence is a worthwhile investment that protects your property and enhances its curb appeal. By following these guidelines, you can ensure your fence remains beautiful and durable for many years. Remember to choose the right stain, prepare the fence properly, apply the stain carefully, and maintain it regularly. With a little effort, you can achieve a professional-looking finish that will make your fence the envy of the neighborhood.
For more information on fence maintenance and repair, [See also: Fence Repair: A Comprehensive Guide] and [See also: Choosing the Right Wood for Your Fence].
